Exterior rendering
Silicone Rendering in West Bridgford | Texture and Detail
The visible silicone finish gives a wall its colour and grain, while the layers beneath it provide the specified background for that surface. Both need attention. Choose a complete system suitable for the wall, then use physical samples to decide how its texture will work around windows, corners and retained materials.

On this page
A fine finish still depends on the preparation
The decorative coat should not be expected to flatten a poorly prepared wall or hold loose material in place. Its appearance follows the condition and shape of the supporting layers. Ask the proposed specification to identify the existing background, preparation, base coat, reinforcement where required and final finish. That makes the scope more useful than a quotation describing only silicone render in a named colour.
Where old render remains, assess its stability and compatibility. Previous coatings, contamination and patch repairs can affect the proposed system. The method should explain any removal, cleaning or treatment required rather than present priming as a universal solution. Uncertain areas need a review process before the final surface is applied.
New masonry also needs to be ready. Incomplete openings, changing service positions or unfinished roof edges can interrupt the work. The renderer should receive a suitable background and resolved connection details, rather than be asked to use the finish to conceal the last unresolved items in a wider refurbishment.
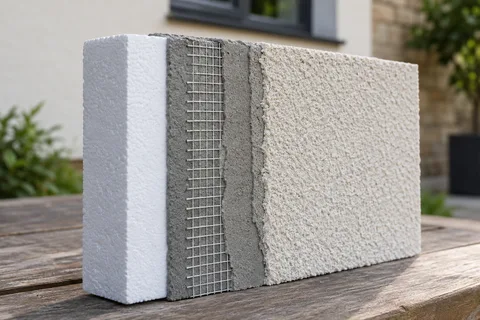
- Sound background A background accepted by the specified system. Keeping old render requires a system-specific assessment of its bond and condition.
- Beads Corner, stop and base beads set the edges and straight lines.
- Basecoat with mesh Glass-fibre mesh embedded in the basecoat resists cracking.
- Primer Where the system requires it, tinted towards the finish colour.
- Silicone finish A thin, through-coloured, water-repellent coat that forms the texture.
Wall on the left, finish on the right. Not to scale: coats, thicknesses and primers follow the chosen manufacturer’s system and the condition of the wall.
Compare grain beside the actual building details
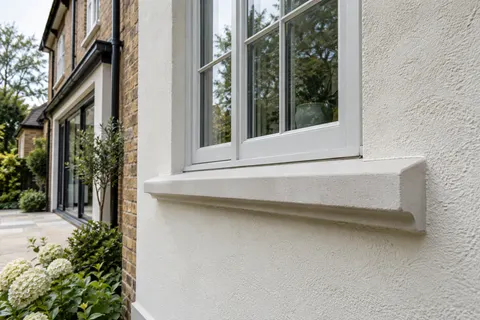
A small change in texture can alter how a surface catches light around a bay or window reveal. Compare the proposed grain on a representative sample, then view it from normal distances. A fine texture may read differently beside coarse brick and a smooth frame than it does in a catalogue. Select from the actual product range being specified.
Colour should be assessed with retained roof tiles, brick bands and other substantial materials in view. Move the sample between shaded and open positions if both are part of the scheme. The same material can look different as light changes, so do not mistake every visual difference for a need to introduce another colour or product.
Record the approved product, shade and grain together. If the specification changes, review the sample decision as well. A similar name from another range is not an automatic equivalent. This matters particularly where a new extension is expected to relate closely to an earlier rendered wall whose original product information may be incomplete.
Resolve the outline of the finish
Window reveals, external corners and the base of the wall need details appropriate to the system. Check the relationship with sills and projections at the proposed thickness. A decorative brick band may remain visible, but its edge and water-shedding function need consideration. The final coat should arrive at a prepared, designed termination rather than an improvised line.
Pipes, lights and other attachments should be planned before application. Identify what is removed, what remains and how each item will be fixed or reinstated. Existing holes and patches may require suitable making good. A neat colour can draw attention to poorly coordinated fittings, so these practical decisions also affect the visual result.
If the silicone finish forms part of external wall insulation, it belongs to that complete system. The added thickness and supporting layers change the questions around openings and attachments. The insulation guide explains why a decorative product choice cannot stand in for a thermal and interface design.
| Check | What should be clear |
|---|---|
| Background | Condition and supported preparation |
| System | Named compatible layers |
| Appearance | Physical colour and grain sample |
| Edges | Openings, projections and termination details |
| Attachments | Final fixing and reinstatement plan |
Allow the product requirements to shape the programme
Application conditions, drying stages and protection should follow the chosen system guidance. A fixed calendar cannot make an unsuitable background or weather period appropriate. Ask how the contractor will manage interruptions and what protection is included. The aim is a consistent planned operation rather than a sequence of rushed patches around unfinished work.
Appropriate access helps the installer work across the intended area. A glazed roof or narrow passage may constrain that arrangement and should be discussed early. Competent access planning is needed even when the finish itself is relatively thin. The decorative nature of the coat does not reduce the need to reach and prepare the wall properly.
Where several elevations are included, agree how the work is phased and where any planned breaks occur. Keep required movement details functional through the system. A request for an uninterrupted appearance should not lead to bridging a joint that the design requires to remain effective.
Treat future cleaning and repairs as system work
Retain the installed specification and relevant maintenance guidance. If staining or growth develops, consider the cause and a suitable cleaning method before choosing another coating. Rainwater defects should be addressed where they contribute to repeated wetting. Cleaning a visible mark does not establish that the source of the problem has been removed.
Damage may require a repair to more than the decorative surface. The render repair guide explains the need to identify the existing materials and sound boundary. A later colour change should also be checked for compatibility with the installed system. Do not assume that any exterior paint is suitable simply because the original finish is already coloured.
Compare silicone with monocouche if the material decision is still open. Their textures and system requirements differ, and neither can be selected solely from a claim that it is the standard choice for West Bridgford. The local housing data does not measure render popularity or establish a product recommendation.
Common questions
Can silicone render cover an uneven wall?
The preparation and base layers must create the appropriate background. The decorative coat is not a substitute for correcting unsuitable or substantial unevenness.
Does every silicone system have the same grain?
No. Product ranges differ. Compare the specified texture physically rather than relying on the general material name.
Can it be used on an insulated wall?
It can form part of a suitable specified insulation system. The complete build-up and interfaces must be designed together.
Is it suitable over any existing paint?
No blanket assumption is appropriate. Existing layers and the proposed coating need a compatibility and condition assessment.
See housing and planning information for West Bridgford and nearby places, including the source and geography behind each figure.